Figured I should finally post what I've been up to lately.
During the summer, I stumbled upon an Ad on CL of a warehouse full of cabinets and parts for sale. A few friends of mine went over to check it out and ended picking up 3 cabinets, a bunch of original boards, and artwork.

There were tons of cabinets there, all mostly converted from their originals, all of them in really bad shape. This warehouse used to be an old chicken coop farm, so you can imagine the smell and filth all around the place. A poor cemetery for arcade cabs...
The seller was taking $100 per cabinet, $10 for each PCB, and random prices for artwork and control panels.
I spotted a few candidates for projects, the better conditioned ones: A Robotron that was converted to JAMMA, running R-Type 2, and 2 cabinets that were Neo Geo converts, one being a Dynamo the other a Centipede. I opted to take the Centipede convert for my project, as I felt it would make the best candidate for a SHMUP cab. This thread will be outlining my cabinet build, but I'll be posting the other 2 later.

Now, I'm a big fan of renovation projects. Mainly for the reason that I no longer have the space to wood-work, but also over the last few years I've been trying to live as "green" as possible. Waste-not, want-not.
I considered restoring this cabinet back to it's former glory, but the cabinet was so hacked up and poorly converted that I would have to spend a ton of money on getting parts, artwork, the whole shibang. In the end, Centipede was never my cup-o-tea as a game, so I figured I'd love to make a tribute to SHMUPs cabinet.
I was racking my brain on what to title this cabinet, but couldn't come up with anything that felt right. Ryglore also helped me out with a few suggestions, but again, we couldn't figure out a good suitable name. A friend of mine is in the US Airforce, so I asked him for some ideas on what to name this. He gave me a few names of past missions, and some on-base terms, but one seemed to fit the best -- Alpha One --. He says they use the call-sign "Alpha one" a lot when for inbound and outbound jets. Basically reporting that all systems are in operational order and still FMC(fully mission capable). This was perfect!
The plan is
Alpha One is going to be a SHMUP tribute. I plan on fixing the JAMMA harness wiring (since it was poorly thrown in there), and for now it's going to host original boards, but will probably throw in a MAME PC later on. I own a bunch of original boards right now, mainly shmups and fighters, so this cabinet will definitely put those to good use. It'll host 2 players, 3-buttons each on the Control Panel, populated with Seimitsu LS-58's w/ octo-gates (my favourite stick for SHMUP'in), and Seimitsu buttons.
The cabinet is going to be White, Black and Orange mainly.
Artwork: I'll be creating my own custom art. The side-art is going to be a small decal, not full-sized covering the entire cabinet like what most people are doing these days, it will be about 20" in height and sit aligned to the monitor's horizon. Old school. It's going to be showcasing SHMUP planes from various games that represent the SHMUP genre, flying towards you in perspective, a radial composition outward from the center.
I was at first planning to feature only 6 planes, but there are so many good candidates to feature that I've now doubled that count, having 6-8 different ones
per side (thanks for the suggestion Ryglore!).
There is a thread I started on the
shmups.forums that has a running suggestion list.
The current un-confirmed list of ships are:
- Galaga
- 1942
- Raiden
- Gyruss
- Flying Shark
- Twin Cobra
- DDP type A
- Battle Garrega: Silver Sword
- Ketsui: Tiger Schwert
- Ikaruga
- Xevious
- Daioh
- Vic Viper
- R-9
- Batsugan Type A
Here is a REALLY rough draft of the Raiden ship. Mainly an exercise for me to understand the shapes of the ship, and the overall form. It's not the right perspective or is completely accurate to the design, but I gotta start somewhere! Colours are also just place-holder...

I'm going to do another version of this, planning on modelling out the overall rough shape of the ships in 3D, setting up a camera angle with proper perspective, screenshot it and then do a paint-over in Photoshop. It'll be the best way of getting that "industrial" design with proper proportions, perspective etc... after that, it'll be taken into Illustrator and vectorized for printing. It's an ordeal, but it's a process I'm used to now that I've been doing Art commissions for various members here. For those who I've done artwork for, consider this as what I would have given you as "the rough 1st draft".
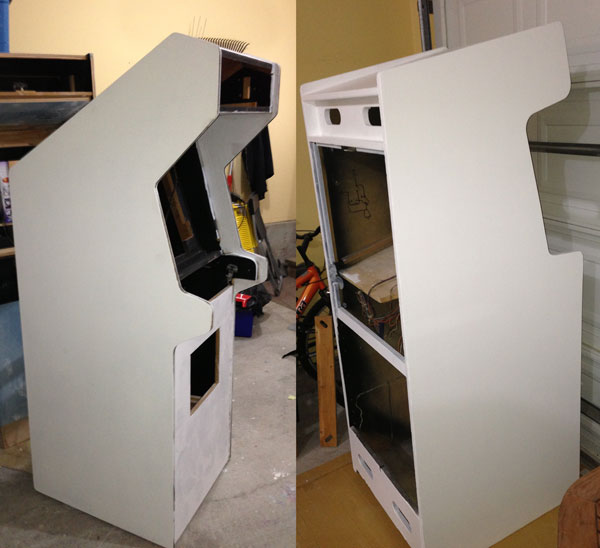
First order of business: Strip it.

Under the shoddy blue paint-work, the original Centipede artwork was there, but it was in really rough shape. Torn, scratched, half-peeled... a sad sight.
Inside the cabinet:

Filthy. The original power transformer block for Centipede is still there (hence Big Blue), but also a newer switching power supply to run the PCB.
The big MVS PCB seems to power up fine, but the monitor doesn't work. I will be keeping the monitor and bringing it back to health (I've got a bit of experience with monitor repair now). The cart installed is World Heroes, not really my game, but whatever, I'll throw it up on ebay or something later.
As you can see, that massive scratched wood peice the board is mounted to is not stock. I'm assuming they put this here for security measures?? bah. a crappy convert none-the-less.
The cabinet gets stripped down to it's naked wood, using a heat-gun to remove the art. I filled in the gashes and chipping damage in the wood and sanded it baby-smooth:

The control panel was also poorly converted, after stripping it down, it looks like swiss cheese!

I've got 2 options here. 1. The easier route is to just cover it again with newly-cut plexi and keep people ignorant of all the holes underneath some sandwiched artwork, or 2. The more involved route: Re-enforce the holes I don't need, Bondo and sand it smooth and not bother with plexi at all. I haven't come to that decision yet.
Primed:
I used a white primer. Rolled-on with foam rollers, 3 coats, sanded in-between.
Added new leg levelers, and painted:

The picture doesn't show this off well, but the paint is actually an "off-white", which isn't as bright as shown. I didn't want pure white, as I feel it would be too hard on the eyes and take away from my plans with the artwork. Again, 3 coats of paint, sanded in-between.
The black is Rustoleum Satin Black that was sprayed on.
Clear-coated and T-molding (I couldn't wait):

The colour scheme looks really great, and I'm glad it turned out well.
Now that the majority of construction work has been done, I can move this into my apartment and work on the electrical and Control Panel work.
Monitor cleaned up nice:

It was really dirty, so I took a damp rag of water and isoprophanol, and started the clean-up. After taking off the layer of dirt and grime on the glass, you can notice there is a slight burn, but not really that bad. I doubt it'll be that noticeable (I've seen worse!), especially since I am going to put some smoked plexi in-front of it.
The chassis:
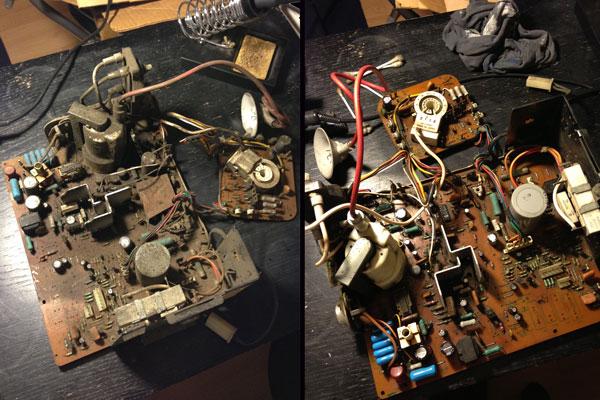
Cleaned and re-capped. I noticed that a couple caps had legs that were ripped off the board, so my assumption is that was the cause of it not working. I haven't tested it yet, that will happen after I've got the cabinet's full wiring sorted out. But if it's still failing that's no problem at all, I have a tested working Electrohome G07 chassis I can swap in, leftover from older projects.
That's where it stands now. Still lots of stuff to do, but at least the "heavy" parts are done.
As always, comments and suggestions welcome, as brutal or nice -- I'm built of leathery scales, so do your worst.


 Home
Home Help
Help Search
 Login
Login Register

 Send this topic
 Print
Print Topic: Alpha One - renovation to a SHMUP Tribute cab (Read 14737 times)


