

In the late 40’s through the 50’s the EJ&E relied on the 2000 HP Baldwin center-cab transfer locomotives as the mainstay of the locomotive fleet. With six axles, six traction motors, and two 1000HP diesel engines, these 75 ft long DT 6-6-2000 units had vanquished the last of the 2-8-2 Mikados in 1948. As a modeler of the EJ&E in 1957 I needed to have a center-cab in my fleet. Choosing which of them to model was easy. I have a picture of my grandfather in the cab of #119. There were three options to choose from – Overland’s brass model, kit-bash, or scratch building.
The brass option was too expensive, scratch building was beyond my current skills, which left a kit-bash. This project had been done before and a very thorough article published by Robert Bochenek in “Railroad Model Craftsman” June 1995. Stewart makes most of the needed parts, they just happen to be stuck in the middle of a different model. Stewart’s AS616 model is the key to the project as that model provides the material for the two long hoods, and the truck side frames. Trucks and power-train were provided by a Stewart Alco Century C628. Both the AS616 and the Alco C628 share the same asymmetric trucks – the axle spacings are not the same for all three axles. Unfortunately, the trucks on the center-cab have an axle arrangement the reverse of the AS616/C628. However,the frame length and bolster spacing is within four scale feet of the correct value. This is going to be an operational model, not a contest queen – it will look like a DT 6-6-2000.
I started this project three years ago and the first step was to get the parts. An order to Bowser/Stewart provided two AS616 shells, side frames and brake parts. I found an Alco C628 on eBay to provide the frame and power-train, and purchased a Tsunami Baldwin sound decoder. Four small Knowles speakers would finish out the sound installation. Part of the documents I have from my grandfather is an operators manual from the DT 6-6-2000 so I had dimensioned drawings to work from.
If I could not get the hood configured then the project was a wash, so I started by dropping the cab (to short) and the short hood (not needed) into the scrap box. Then the two long hoods got cut into five pieces and two from each hood were discarded. This step got the radiator to the proper length, removed the fourth top access panel, and removed an extra set of side doors.

After truing up the cuts the hood was carefully glued together. A bit of red Bondo patched up a couple of slips with the saw. The two new long hoods were carefully measured, trimmed, and joined to create the 69‘ long hood structure for the center-cab. Two AS616 decks were also cut so that they could be joined together as the new deck. A strip of styrene was added to the bottom of the hood to serve as the visible frame which extends from the deck to the bottom of the doors. Fit together they begin to look like part of a center-cab, minus the cab.

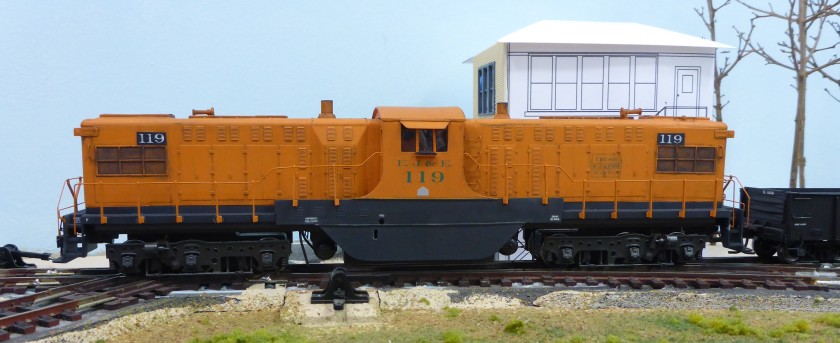
Constructing the cab was a challenge but it broke down into several steps that were done in stages. The EJ&E units had aprons on the sides below and toward both ends from the cab, with stylish curves. See the photo at the top of the post. Step one was to develop the drawings and cut the cab sides from 0.020″ styrene. The side-wall height was left a couple of millimeters high at this point. Step two was to cut the cab front and back parts to fit the hood, the deck, and the roof curvature. These components were then taped in place on the hood, deck, and chassis to check the fit and to mark the chassis for trimming the extra material from the fuel tank area. An over-sized piece of 0.020″ styrene was taped to a curved form, carefully heated and allowed to cool on the curved form for the roof. There was some warpage around the edge and the extra material was cut away. Windows were cut, doors scribed, corner braces of strip styrene glued in place and the cab was assembled with care to be sure it was square. Index guides were glued to the hood sides and top to provide a firm base to lock the cab in position. When the fit of the cab and walkway was correct it was secured to the deck with #80 screws into tapped styrene blocks under the cab walkways.

Modifications to the frame included cutting away metal from the fuel tank area to fit a square fuel tank constructed of styrene, building and fitting two transverse air tanks, filters, and piping, and fitting four very visible large drain lines for engine and air compressor oil. Other than adding a set of wipers to the third axle which improves the power reliability on these Stewart chassis, no modifications were done to the trucks except to replace the C628 side-frames with the Baldwin AS616 side-frames.

Stanchions from Smokey Valley – an Alco RS2 set – were used for the side hand rails which were formed from 0.0125″ phosphor bronze wire. The end handrails were custom built from very small brass strips, phosphor-bronze wire, and solder using a jig. All of the old handrail holes were filled, holes in the pilot filled, and new holes drilled to fit the smaller rails. Wire cut levers were installed with small lift rings as pivots. Since these units were not MU’ed until after they were re-built in ’58, only a train line was installed on the pilots.
Research on the EJ&E Yahoo list led to a photo of #119 in 1957 showing a simple orange hood and cab with black frame, apron, and trucks. The model was primed with MOW grey Scalecoat 2 paint, and then given two coats of a mix of Reefer Orange and Daylight Orange for the hood areas, and Engine Black lightened with a bit of MOW grey for the deck, pilots, tank, frame and trucks. Green cab lettering and numbers were applied from a set of Microscale EJ&E diesel decals, using the older Roman style letters. Dull-coat and a light black wash were applied followed by another coat of dull-coat.
Installation of the electronics was easy given the space inside the shell. An enclosure was built at each end to hold two Knowles flat speakers. LED lights were installed and the Tsunami Baldwin decoder installed on top of the motor. With four speakers the volume needs to be set fairly low to be tolerable, but the sound quality is excellent. I am experimenting with some heavy reverb on the exhaust to give an effect of dual prime movers.
Operation of the locomotive is smooth and darned if it does not look and sound like it’s prototype . The deck sits about 2mm higher than it should due to a mis-match between the C628 frame and AS616 decks so the crew has a big first step to climb up. I may mill a new frame next year to correct that or modify the existing frame, but for now I am going to enjoy operating it, watching and listening as it burbles down the tracks.

There’s something so brutish about the DT-6-6-2000 and the EJ&E seems like the perfect railroad to have one
LikeLike
That unit is beautiful. The family connection makes it more special. I saw some rebuilt units in Waukegan in 1973. they looked like a very bad kitbash except they were real.
LikeLike