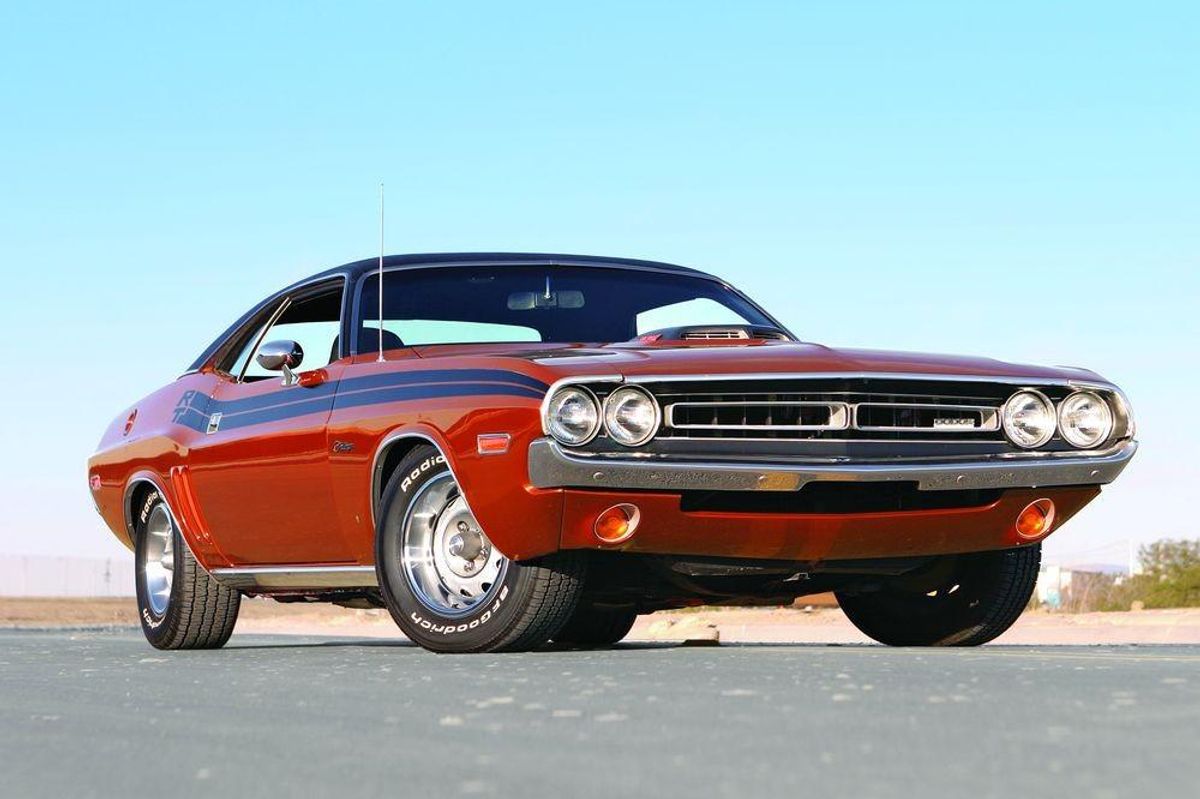
1971 Dodge Challenger R/T
The other 1971 Chrysler E-body is worthy of a strong buy rating
09/24/2018
Chrysler's E-Body was to the muscle car bubble what Florida (not to mention California, Nevada and Arizona) were to the U.S. real estate bubble. At the very top of said muscle car bubble? All together now: The 1971 Hemi 'Cuda convertible--Plymouth's outrageous drop-top street-legal race car, of which 11 were built.
Three years ago at RM's Vintage Motor Cars in Arizona auction, one of the heavy 11 changed hands for a lofty $2.42 million. That was before the 2008 stock market collapse--but it's safe to say that those cars are still coveted enough to draw out collectors with seven figures to spend.
What has more likely taken a beating in this market are the hopes of collectors looking to retire rich off the sales of the less rare and less sought-after E-bodies. Case in point, the subject of our feature Buyer's Guide, the 1971 Dodge Challenger--a fine machine in its own right, though not a car that enjoyed Hemi 'Cuda hysteria.
''The prices on the cars are directly related to the prices of homes and the economy,'' said Julius Steuer of Restorations by Julius in Chatsworth, California, specializing in 1962-1974 Chrysler products. ''The car prices have dropped to half or less. The rare cars with good documentation still have some value.''
What caused the wild price run-up in the first place? Good question, says Steuer. ''Hemi 'Cuda convertibles were selling at auctions for $2-$3 million. That dragged all the prices up with them. 'If a Hemi 'Cuda convertible is bringing $2 million, then my hardtop has to be worth $750,000 to $1 million.' It was that type of mentality that turned into a bandwagon. Everyone had to have a Hemi car, so they jumped on the bandwagon. A lot of the people spending big money were first-time Mopar buyers. Lots of people were refinancing their homes and taking the money to buy their high school car again."
So where does that leave the aspiring E-body buyer? Probably in a much better bargaining position than he was a few years back. Particularly if he's searching for one of the more reasonably priced cars. Steuer says that purely from a value standpoint today, 1971 was an odd year for the Challenger due to a few factors.
''The biggest engine you could get in a convertible was a 383 with a four-barrel carb. So restoring a [Challenger] convertible is not high on the desirability list,'' he said. ''My formula for finding a quality car for restoration would leave you with a car that has multiple carburetion as a prerequisite. A 440 Six Pack or a Hemi. The other very rare option on a Challenger is a Shaker hood with any engine, 340, 383, 440, 440 Six Pack or Hemi. Even though the 1971 model year had less production, I believe the 1970 model year had higher values, except for a very few models (Hemi cars).''

Body
The Challenger sported some updates for 1971. Up front, an angled, two-panel ''venturi'' grille insert was set between the headlamps, while in the rear, the former one-piece taillamps were split into two, incorporating the reverse lamps. The R/T gained body-colored fiberglass-simulated twin air scoops in front of each rear wheel, and all Challengers could be ordered with flexible, body-colored Elastomeric front and rear bumpers and a vinyl roof.
With any car of this vintage, the vinyl roof covering can give corrosion a nice safe, damp place to grow. Blisters and bubbles that can be seen (or felt) through the vinyl may just be the tip of the rustberg.
The trunk and quarter panels as well as the rockers are also common areas, as is the cowl around the brake master cylinder and hood hinges. Floors, typically in the lowest points of the footwells, can be rusty in these cars as well, and the rust might even extend beneath the seats.
The good news is the skyrocketing value of E-bodies over the last 10-20 years has made them a prime target for the aftermarket. Virtually every piece of these cars is now being reproduced in its entirety. And for those parts that aren't available, there are patch panels on the market. Roof skins, roof braces, cowls, inner and outer fenders, complete quarters, floor pans and more are now just a major credit card number away.
Steuer points out that the '71's grille is an important piece of any restoration.
''Because the '71 model year has a plastic grille, this is an important part to have in good condition when buying a used car,'' he said. ''The finish panel in the rear is also important. There are no reproductions of either of these available.''
Steuer also points out that a Shaker hood is one of the more desirable and rare body panels that any Challenger can have. The N96 Shaker Hood Fresh Air Package was available on any four-barrel or multi-carb-equipped Challenger. Interestingly, just 72 base-model Challengers were equipped with the hood and, while the Shaker was standard on the Hemi 'Cuda, it was an option on a Hemi-powered Challenger R/T.
Engine
The 1971 model year would mark the last pass for the 440 in a Challenger--as well as the Hemi--while the R/T package would be replaced by the Rallye 340 in 1972. Buying a convertible Challenger in 1971 meant you could neither get the R/T option nor the 440.
The 335hp 383 was no longer available, and the 375hp 440 was missing in action as well. As the Challenger T/A option was gone for 1971, the 290hp 340 Six Pack was similarly history. What you could get was a standard (in the Challenger R/T) 300hp 383 or a 275hp 340. The optional V-code 440 Six Pack was detuned 5hp and rated at 385hp at 4,700 RPM and 490-lbs.ft. of torque at 3,200 RPM. It used a forged performance crankshaft, heavy-duty valve springs, magnafluxed connecting rods, high-tension oil control rings and 2.08-inch-diameter intake and 1.75-inch-diameter exhaust valves. It also had the distinction of being externally balanced--something that wasn't common on Mopars.
The thundering Street Hemi was still up for grabs, with 10.2:1 compression and 425hp. In 1971, just 486 cars were built with Hemis company-wide.
Of course the main things to be on the lookout for when shopping for a big-inch, well-optioned E-body are fakes and forgeries. If originality isn't a concern, then your shopping will be substantially easier, not to mention cheaper. But if you're laying out numbers-matching money, you want to be sure you're receiving a numbers-matching vehicle. Buying through trusted sources is always a good idea, or consulting an expert prior to the sale.
''If you are buying a Hemi car, there are special Hemi-only reinforcements that have to be there,'' Steuer said. ''The VIN should appear on the dash, the cowl, the radiator support, and the fender tag. If you are lucky enough to have a matching-numbers car, it will also appear on the engine and the transmission. After that, if you are not sure, call me.''
Transmissions
Three-speed and four-speed manuals were available throughout the E-body's run. The three-speed manual was the standard transmission with the six-cylinder, the 318, 340 and 383. It wasn't available with a 383 four-barrel, the 440 six-barrel or the Hemi. Conversely the A-833 four-speed wasn't available with the six or the 383 two-barrel. Four TorqueFlites were available, depending on the choice of engine, and just two transmissions were courageous enough to stand up to the Hemi, the A-833 four-speed manual and the A-727B TorqueFlite.
Chassis and rear
Chrysler's E-body cars are unit-body based, with a front subframe comprised of two side rails and three cross members. The center crossmember in the subframe is called the K-member, because it's shaped like a K, and it supports the engine and the front suspension.
This is worthy of discussion because six-cylinders, small-blocks, big-blocks and the Hemi each used unique K members, though on 1970-1974 models, small-block cars and big-block cars shared a K-member.
Chrysler E-bodies use upper and lower control arms with torsion bars acting as springs. While the upper arms are shared among all cars, the lower arms were different, depending on whether the car had a front anti-roll bar or not--most high-performance models used a front anti-roll bar. Parts are widely available for E-body front ends both in OEM spec and upgraded aftermarket for improved handling performance.
In the rear, E-bodies used semi-elliptical, multileaf springs. Most cars were equipped with a pack of 4.5 spring leaves, but 1970 and '71 Challengers with the 440 or Hemi had 5.5-leaf springs.
The standard rear with the six-cylinder and the 318 was Chrysler's 7½-inch axle with either a 2.76:1 or 3.23:1 ratio. The 8¾ was standard with other V-8s and available with 2.76:1, 3.23:1, 3.55:1 and 3.91:1 ratios. Ordering the Super Performance Axle Package, the Track Package or the Super Track Package got you the bulletproof Dana 60. The Dana 60 was also installed in 440- and 426-powered cars when a four-speed manual was ordered. Gear ratios installed in the Dana include 3.54:1 and 4.10:1.
Interior
Complete interior kits for 1970-'72 E-body cars that include front and rear seat upholstery, carpet, front and rear door panels, armrest pads, seat backs, kick panels and pillar post moldings are available for less than $2,000. Any of the aforementioned pieces are, of course, available individually as well--as are dashpad covers. Anything that isn't being reproduced can undoubtedly be located used or NOS from the vast network of parts suppliers and E-body junkies.
The Challenger, convertible and R/T were all equipped with high-back bucket seats with molded-in headrests available in blue, black, green, tan, white and gold in the R/T. Leather and vinyl upholstery were available on a Challenger but only in black. It was possible to get a bench seat with an armrest in the base Challenger, in either green or black and only on cars sold with automatic transmissions.
Ordering the Rallye instrument cluster on a Challenger (it came standard on the R/T) netted you a woodgrain dash panel, full instruments, a trip odometer, an 8,000 RPM tachometer and a 150 MPH speedometer. A floor-mounted cassette player/recorder with an optional plug-in microphone was new for 1971 and is a sought-after novelty item today. There were three steering wheels offered in the 1971 Challenger: the standard three-spoke with a black plastic rim and padded horn button in the Challenger coupe, the three-spoke woodgrain rimmed wheel in the Challenger and Challenger R/T and the optional 14½-inch Tuff wheel with a padded rim in the R/T. Reproduction wheels are available, and used pieces aren't difficult to find.
Is there a '71 Challenger in your future? Now might be the best time to buy this Mopar muscle car favorite, while prices are down from all-time highs and restoration parts have never been easier to find. There is also a wealth of information in print and online about these cars--another side effect of their skyrocketing popularity--so opportunities to educate yourself are truly endless.
Specialists
Inline Tube
800-385-9452
www.inlinetube.com
Wildcat Auto Wrecking
(Parts for all Mopars)
503-668-7786
www.wildcatmopars.com
SMS Auto Fabrics
503-263-3535
www.smsautofabrics.com
Parts prices
Battery - $419
Brake calipers (pair, remanufactured) - $215
Bumpers (pair) - $539
Carburetor (rebuilt) - $499
Carpet - $189
Console shell - $495
Cowl - $795
Dashpad - $1,000
Engine (426 Hemi) - $14,999
Exhaust manifolds (Hemi) - $1,179
Fenders (front, pair) - $1,179
Floorpan (front) - $665
Go-Wing - $499
Headliner - $80
Hood scoop, Shaker (complete) - $685
Hood, Shaker - $995
Ignition coil - $70
Kick panels (pair) - $100
Quarter panels (pair) - $1,195
Radiator - $385
Roof skin - $765
Seat covers (front) - $389
Springs, rear leaf (pair) - $329
Starter (remanufactured) - $119
Steering wheel, Tuff - $369
Tachometer - $239
Tail panel - $499
Torsion bar, pair (Hemi) - $305
Transmission rebuild kit (4-speed) - $239
Tires, Goodyear Polyglas (set) - $1,019
Trunk mat (herringbone) - $50
Wheel, steel (each) - $139
Wiring harness (dash) - $539
CLUB SCENE
Walter P. Chrysler Club
616-375-5535
www.chryslerclub.org
Dues: $25/year; Membership: 5,000
National Chrysler Products Club
P.O. Box 64
Fayetteville, Pennsylvania 17222
www.nationalchryslerproductsclub.com
Dues: $25/year; Membership: 325
Mid-America E-Body Club
712-423-3837
www.angelfire.com/super/ebodymoparclub/
Dues: $25/year; Membership: 100
What to pay
1971 Hardtop:
Low: $12,500
Average: $20,000
High: $30,500
ADD:
383 engine, 40 percent; Six Pack, 130-150 percent; 426 engine, 500-600 percent; four-speed, 10 percent
In the February 2010 1963-'67 Corvette Buyer's Guide, we incorrectly listed one of the Corvette Specialists. The listing should have read:
Corvette Specialties of Maryland Inc.
410-795-3180
www.corvettespecialtiesofmd.com


By Jim Pickering
The 1967-’72 “Action Line” trucks from Chevrolet and GMC moved the pickup game forward with attractive new styling, clever engineering, and a focus on cabin comfort. Two- and four-wheel drive, Fleetside and Stepside bed styles in 6 1/2-foot or 8-foot length–these haulers sold in big numbers and have been collectible for decades. Survivors have become popular subjects for restomodding since their straightforward construction and great parts availability makes them ripe for performance and comfort updates. If you’re buying or already own a C10-K10/1500 half-ton or C20-K20/2500 three-quarter ton truck, and want to make it more everyday usable, you’ll benefit from a copy of the latest entry in CarTech’s Performance How-To series.
Author Jim Pickering walks readers through customizing his own ’67 C20. He offers a historical overview of this era of GM truck and a buyer’s guide, before going step-by-step into how to take them apart, repair rust in the cab and bed, and alter the frame. Chapters include upgrading the front and rear suspensions, modifying brakes with factory or aftermarket parts, building axles, choosing between engine options, and improving cab comforts. The 176-page softcover contains nearly 500 detailed, captioned color photos and offers enthusiasts an excellent overview of what a vintage Chevy and GMC pickup can become with desire, skill, and money.


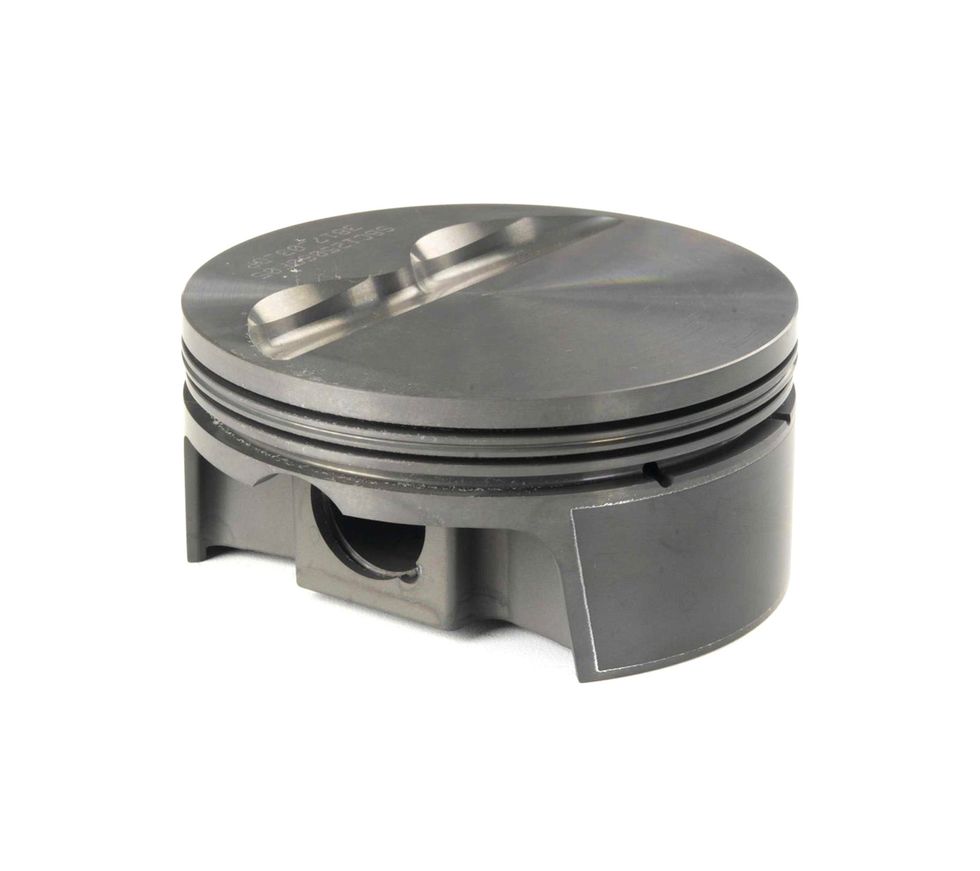 The piston top plays a vital role in determining compression on any engine. Dished pistons will add to the combustion chamber volume while domed pistons are intended to reduce overall volume and increase compression. The ideal combustion space combination is a flat piston top with a small chamber to improve combustion efficiency.Photo: Courtesy of Mahle Motorsports
Before we get into specifics, let’s first discuss how compression ratio is determined. In the old days before computers, engine builders had to run through the laborious task of determining the volume of each of the above variables. Bore and stroke for the cylinder is easy using the basic geometry of the volume of a cylinder which is the area of a circle (the bore) times the depth or length of the cylinder. The formula is from high school geometry: Pi x radius x radius x length. This is also the same formula you would use to calculate the volume of the piston above or below the deck as well as head gasket volume based on bore size and the thickness of the gasket.
The formula to compute the volume of the cylinder at the top of the stroke includes the piston top configuration (dish or dome), chamber size, head gasket thickness, and the distance the piston was either above or below the deck surface of the block. With regard to piston position, a piston that stopped its travel below the deck effectively adds this volume to the chamber size while a piston that travels above the deck would reduce that volume from the chamber.
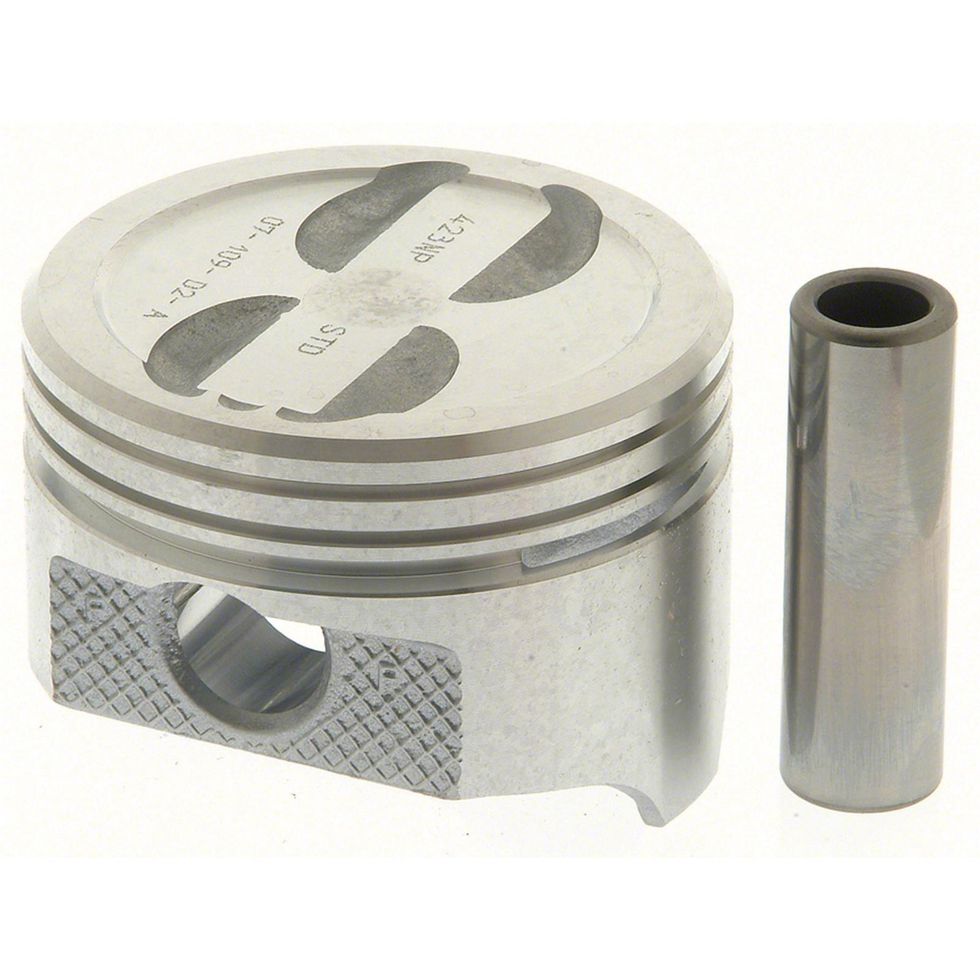 Even simple valve reliefs can affect compression. This standard four-eyebrow small-block Chevy replacement piston measures nearly 7cc’s worth of volume. Compare that to a pure flat-top, 6.0-liter Mahle piston with no reliefs. Of course, ensuring proper piston-to-valve clearance is important with either piston but the balance is always a compromise between adding compression yet avoiding bending valves when they hit the piston. Photo: Courtesy of Mahle Motorsports
We won’t get into the long-hand version of calculating compression only because it is both tedious and unnecessary now with the advent of online compression ratio computer programs. But it is important to understand the relationships between the components so that you can make decisions more effectively.
To assist in this process, you may need to convert combustion chamber volume that is usually measured in cubic centimeters (cc’s) into cubic inches or the opposite of cubic inches into cubic centimeters. We’ve listed these conversions in a separate chart to make finding them easy. As an example, a 70cc chamber converted to cubic inches would be 4.27 cubic inches.
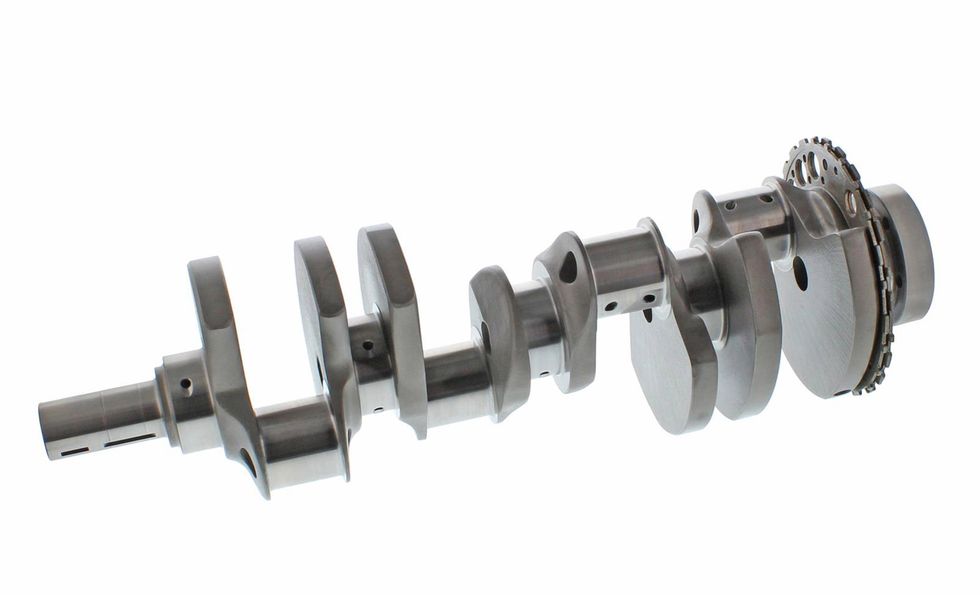 As mentioned in the story, crankshaft bore and stroke are significant contributors to compression or the lack of it. It is much easier to create compression with a longer stroke engine than one with a shorter stroke. This is a 4.00-inch stroke crank for an LS engine. Bolt this crank in with a 4.010-bore flat top piston with valve reliefs, a 70cc chamber and a near-zero deck and this will push compression up to over 10.6:1.Photo: Courtesy of Mahle Motorsports
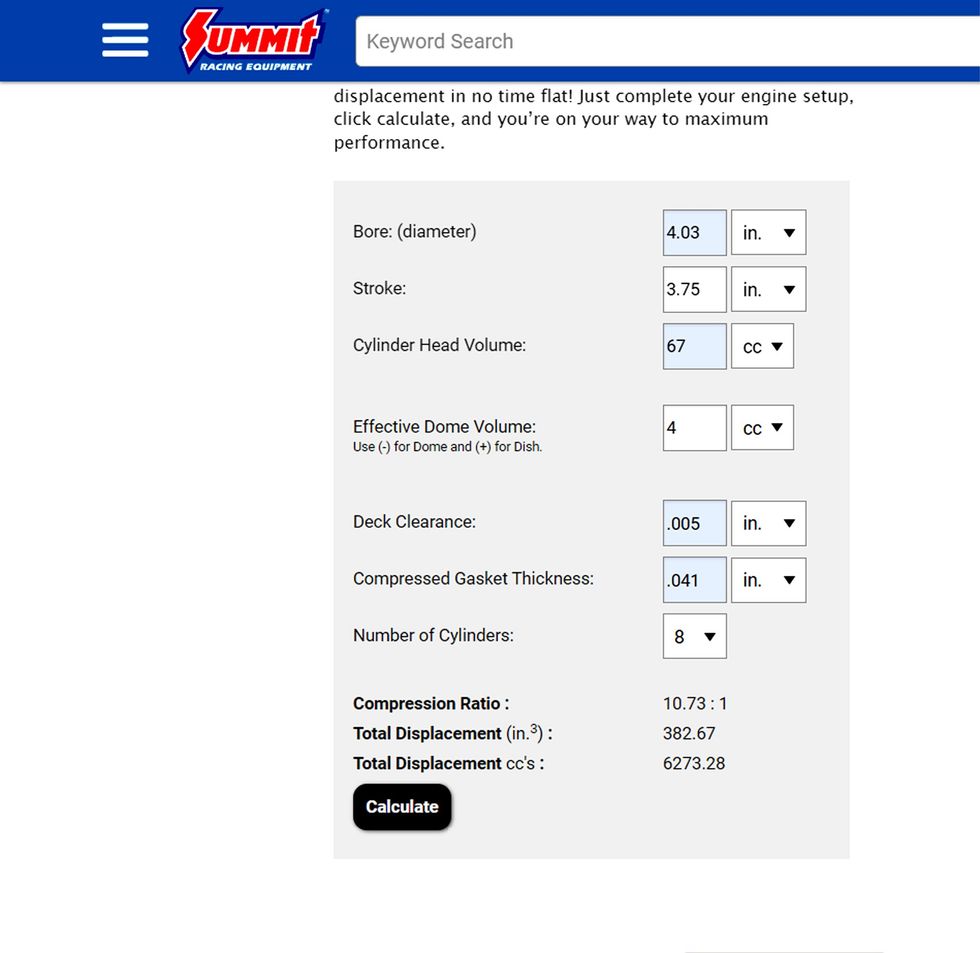
Let’s start with the most basic item of bore size. An aspect that is not generally known is that increasing the bore size will also increase compression. As an example, let’s start with a 6.0L LS engine with a 4.00-inch bore, a 3.62-inch stroke, a 70cc combustion chamber, a pure flat top piston that is 0.005-inch below the deck surface and is using a 0.053-inch-thick head gasket.
Using Summit’s free online compression ratio calculator, the program gives us a compression ratio of 10.1:1. Now, if we increase the bore diameter to 4.030-inch, this increases the static compression ratio to 10.22:1.Then, if we change to a block with a larger 4.155-inch bore, our original 10.1:1 jumps to a more impressive 10.7:1 ratio.
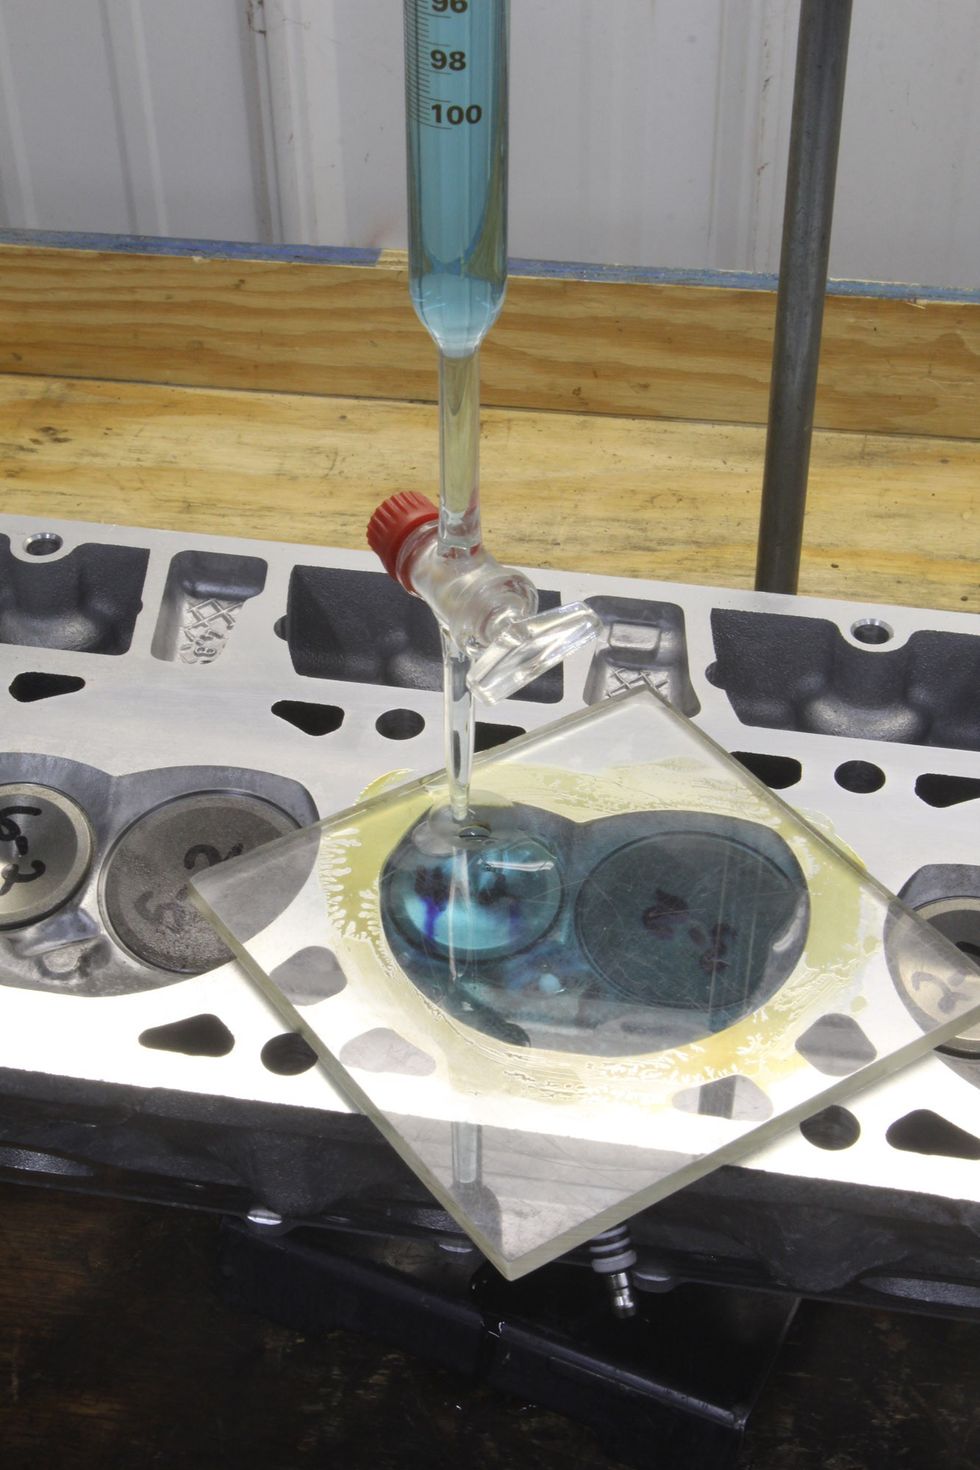 The best way to know the volume of any combustion chamber is to measure it with an affordable 100cc burette and a flat plexiglass plate. This is a simple procedure that produces very accurate results. Photo: Jeff Smith
Stroke has a much more dramatic effect on compression because of the substantial increase in volume that it creates. Let’s take our original 4.00-inch bore and 3.62-inch stroke LS engine stroke at 10.1:1 and add a 4.00-inch stroker crank to the mix. The original displacement was 364ci but now with a longer stroke, the cubic inches expand to a more impressive 402ci. On top of the displacement, this 0.380-inch increase in stroke drastically affects the compression pushing the original 10.1:1 now to 11.06:1.
The inverse is also true where a short stroke engine will have difficulty in creating static compression and is affected by small changes in chamber volume, gasket thickness, and piston top configuration. For this example, we’re going to go way back in time to a small 283ci displacement small-block Chevy to illustrate this point.
 The position of the piston relative to the cylinder head deck is also critical. Most engine builders prefer to place the top of the piston at or near the deck surface, but you must also pay careful attention to piston-to-head clearance as well. A tight piston-to-head clearance for a typical wedge cylinder head engine might be 0.037-inch. Photo: Jeff Smith
The stock bore and stroke on a 283 is a combination of a 3.875-inch bore and a 3.00-inch stroke. With a 58cc combustion chamber, a flat top piston with four small (for a total of 8cc) valve reliefs, a 0.020-inch below deck height and a steel shim head gasket that is only 0.015-inch thick, the compression ratio for this engine comes out to 8.96:1. But often hot rodders will bolt a 64cc head on a 283 with bigger valves to try to make more power. What they don’t realize is that with a very short 3.00-inch stroke crank, a small chamber increase in size of 6cc has a big effect on compression. This change to a 64cc head will skewer the original compression ratio of 8.96:1 to 8.35:1 or a loss of over half a ratio!
But changes in chamber volume on a 4-inch stroke engine can be more dramatic even when the percentage of volume change is less than the smaller displacement engine. A change of 6cc in chamber volume on a 4-inch stroke, 4-inch bore engine while keeping all the other variables the same is worth a change of nearly three-quarters of a full point.
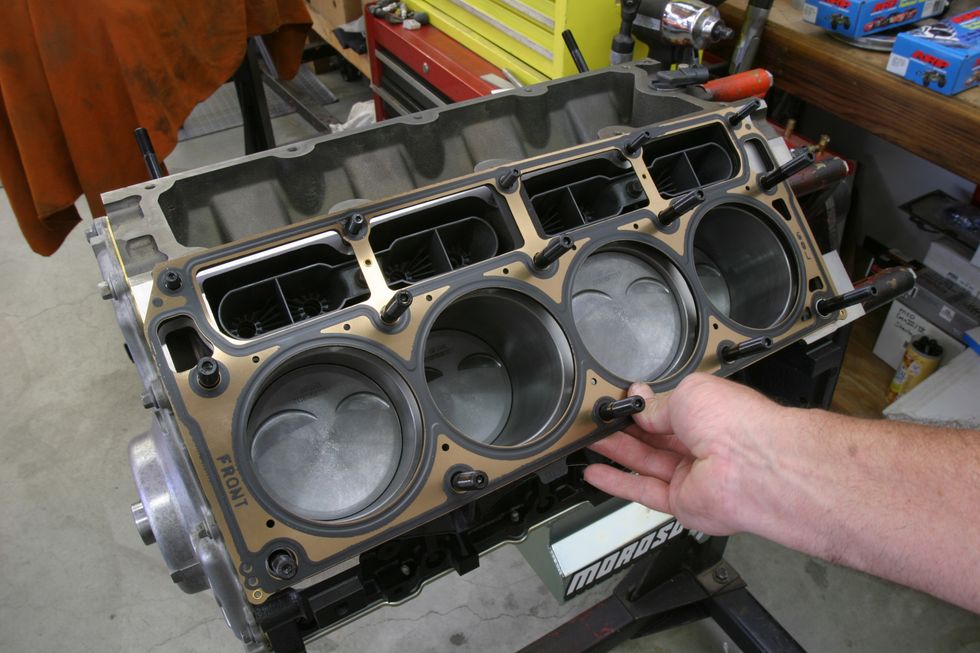 Another important variable is the compressed thickness of the head gasket. Many stock LS style MLS head gaskets can measure 0.053-inch and more. If you use one of these gaskets with a piston 0.020-inch below the deck surface, the compression ratio will suffer horribly so it’s always best to check before ordering gaskets.Photo: Jeff Smith
The numbers don’t lie. With a 4.010-inch bore, a 4.00 inch stroke, 70cc chamber, 0.051 gasket, a pure flat top piston, and a piston 0.005-inch below the deck computes out to 11.15:1, but add 6cc with a larger chamber and the compression drops to 10.45:1 or a drop of 0.70:1 in the ratio. These examples offer clues as to how easy it is to generate compression by simple changes.
Even the smallest details can offer advantages if you pay attention to their effects. As an example, piston design is a place where the smart engine builder can take advantage of his choice of piston top configurations. Most engine builders will agree that a small combustion chamber and a flat top piston with small valve reliefs are among the best ways to not only increase compression but also optimize combustion efficiency.
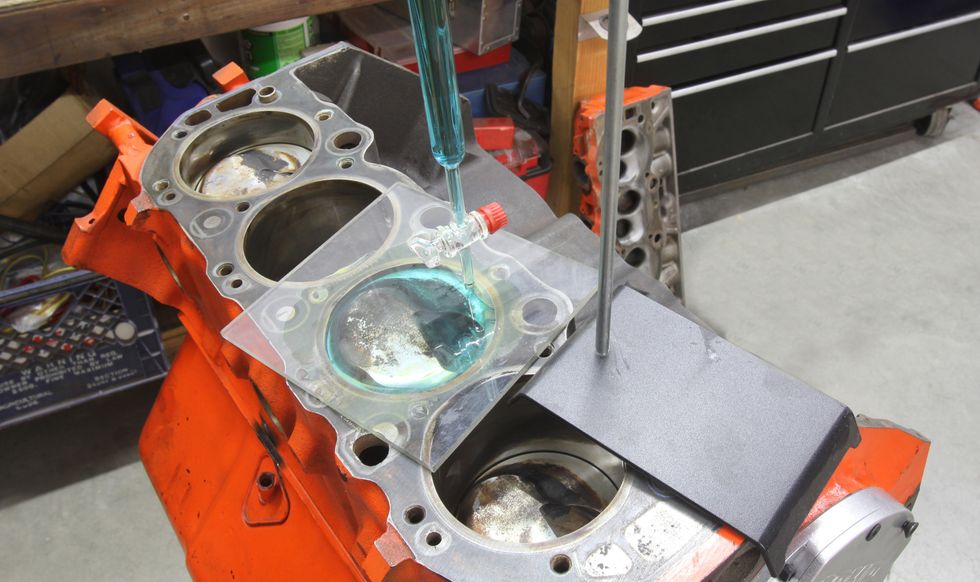 If you are working on an engine with unknown components, you can position the piston a known distance down from the deck and use a 100cc burette to measure the volume of that cylinder. Then compute the volume of a theoretical cylinder with no valve reliefs, dish, or dome. Comparing the theoretical volume with the measured one will produce an accurate description of the piston in question. In this particular case, we established an accurate measurement of the effective dome volume of this piston.Photo: Jeff Smith
The GM LS family of engines is a classic example. Even the original LQ4 6.0 liter LS truck engine from the early 2000’s offered a 7cc dished piston combined with an intermediate sized 71cc combustion chamber to create a 9.5:1 compression ratio to run on 87 octane. A simple trick to enhance power is to add a pair of 5.3L LM4/LM7 heads with smaller 61cc chambers to bump the compression and gain some near free horsepower and torque.
Our calculations reveal a 61cc chamber will push the compression a full point from 9.3:1 to 10.3:1. Even though the 5.3L heads employ smaller intake valves, the increase in compression more than compensates and overall drivability is improved with more torque and horsepower.
Besides the large component options like pistons and combustion chambers, it’s best not to overlook the smaller yet significant details like head gasket thickness and piston deck height. For most engine builders, these two measurements are linked to help establish piston-to-head clearance.
We won’t get into too many details because the options are near limitless. But generally speaking a piston-to-head clearance for a street engine should be established around 0.040-inch or slightly tighter. This is important because sufficient clearance is necessary to prevent piston rock from angling the piston and hitting the combustion chamber.
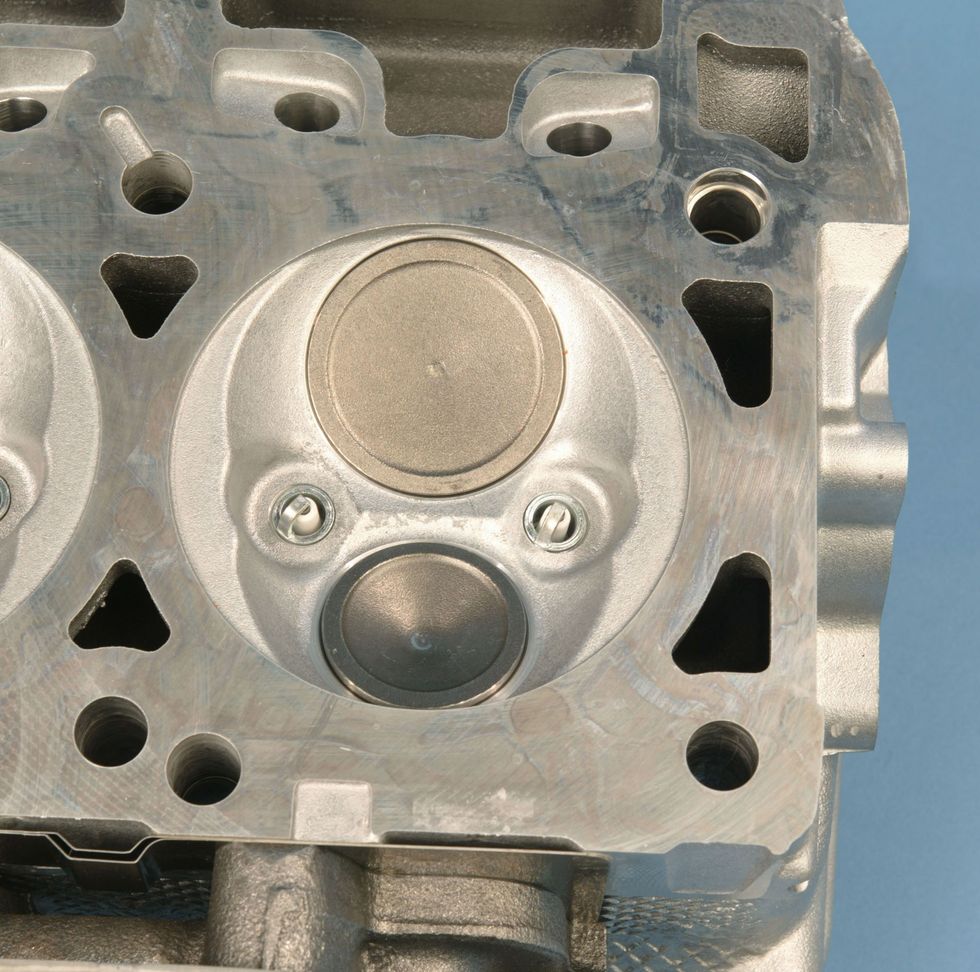 The modern Gen III hemi head is a hemispherical head in name only. Note that the chamber ends on opposite sides with flat or quench areas. These quench areas help with mixture motion as the piston nears top dead center (TDC) and improves combustion efficiency. Note that all Gen III Hemi engines use two spark plugs per cylinder to compensate for the long distance the flame front would otherwise travel to complete the combustion process. Both plugs fire at the same time and thus help improve both power and fuel mileage. A single spark plug in a Gen III Hemi would require a significantly increased ignition timing to approach the power made by using two plugs per cylinder. Photo: Jeff Smith
For wedge combustion chamber engines, this also establishes a tight quench area which is defined as the area between the flat areas of the chamber and the piston. As the piston arrives at TDC the tight clearance between the head and piston pushes (or squishes) the air and fuel into the chamber. This creates turbulence in the chamber and helps to stir the air and fuel into a more homogenous mixture that will combust more efficiently.
This means if you have an engine like an older small-block Chevy where the piston is buried deep in the cylinder to perhaps 0.025-inch, a thinner head gasket can be used to maintain the piston-to-head clearance at around 0.040-inch or less. One example of this would be the coated thin steel head gasket from Fel-Pro that measures only 0.015-inch (PN 1094) for a 350ci small-block Chevy. This will improve compression compared to a much thicker composition head gasket.
We’ve covered quite a bit of ground regarding compression ratio in hopes of offering some solutions or opportunities that you can take advantage of when building your next engine. It’s often the little details that can make all the difference.
There are several free, online compression ratio programs to choose from. This one is from Summit Racing that you can find by searching Summit compression ratio program. These programs allow you to experiment with different chamber, gasket, and piston volumes to come up with the best overall compression ratio for your engine.
Photo: Courtesy of Summit Racing
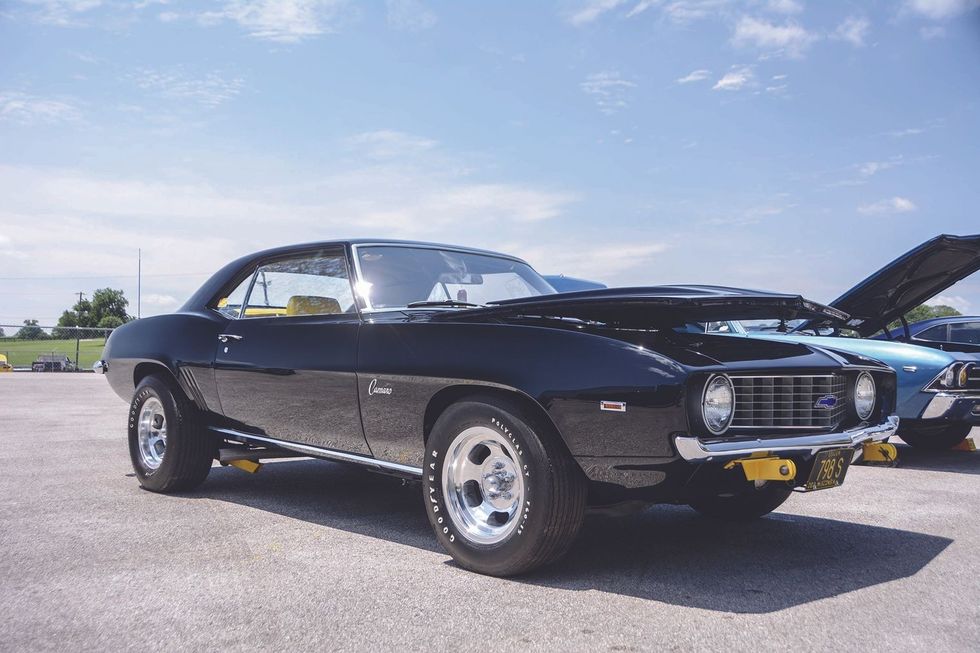
Some of the hottest muscle cars of the era, like this 427-powered COPO Camaro, had compression ratios of 11:1 or even greater.
Photo: Tommy Lee Byrd
Many muscle car engines from the late 1960s and early 1970s benefitted from compression ratios that were as high as 11:1. With today’s watered-down 91 and occasional 93 octane premium fuel, this often isn’t sufficient to prevent those older engines from detonating. Sure, you can mix in a little octane booster or race gas, but that’s expensive.
With today’s fuel, most sources will suggest no more than 9.0:1 for a compression ratio with iron heads. Our experience indicates you can run closer to 10:1 if the piston-to-head clearance is tight and the heads offer a decent, more modern chamber – like the newer LS engines, for example. Older engines with poor chambers tend to rattle with more than 10:1 to 10.5:1. Camshaft timing also has an effect on performance with bigger cams demanding more static compression compared to a street engine with milder cam timing. These engines are run more favorably with less compression. Of course, the more compression, the more power the engine will make with better efficiency so it’s a critical point.
It’s also possible to slow down the ignition curve and reduce timing, but these tend to make the engine run sluggish and unresponsive, which is not fun to drive. While you could rebuild the engine with a lower compression ratio with different pistons or cylinder heads, there are other alternatives.
Let’s take an example and show how we could reduce the static compression ratio on an original 350-cu.in. LT1 small-block Chevy without changing pistons or using different cylinder heads with larger combustion chambers.
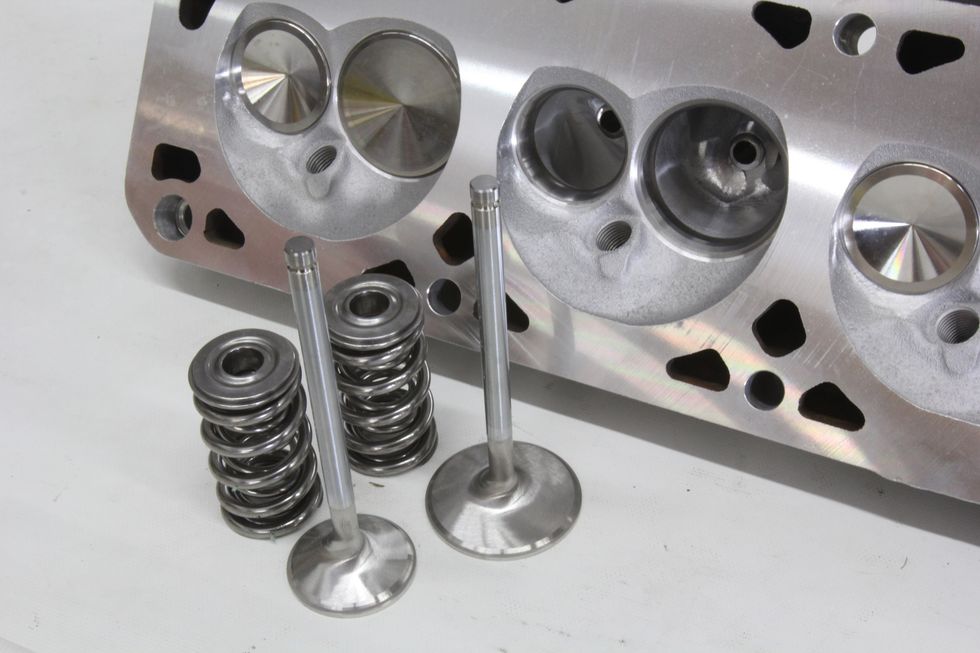
This is a pocket ported 5.3-liter cylinder head from our friends at West Coast Racing Cylinder Heads. Bolting on this smaller 61cc chamber head on a 6.0-liter engine is worth more than one full point in compression. The rule of thumb is one full point of compression is worth roughly 4 percent power, which on a 500 horsepower engine would be worth an additional 20 hp!
Photo: Jeff Smith
We simulated a 1970 LT1 using Summit Racing’s online compression ratio program. We came up with a 4.00-inch bore, 3.48-inch stroke, a 64cc chamber and a piston with a roughly 2cc dome (it’s really bigger but once the valve reliefs are subtracted from the dome volume, the net volume change is roughly 2 cc’s), with the piston 0.025-inch below the deck running a 0.020-inch head gasket. This combination creates a compression ratio of 11.2:1. Often back in those days the compression ratio was often lower than the specs due to production tolerances, but we’ll use these numbers.
One way to reduce compression would be to add a thicker, composition style head gasket. For example, merely replacing the stock shim gasket with a Fel-Pro 0.041-inch composition version will drop the static compression ratio down from 11.2:1 to 10.58:1. This will help but there are repercussions with this approach. This move changes the piston-to-head clearance from roughly 0.045-inch to a much wider 0.066-inch. This reduces the quench effect and might create a situation where this makes the engine more detonation sensitive. This is something to consider before choosing this approach.
A more time-consuming idea would be to increase the combustion chamber volume through grinding the iron chambers. With the addition of 4 cc’s to the chamber volume with the same thin had gasket, it’s possible to cut the compression to 10.64:1. This approach will require some knowledge and skill with a grinder, but it is possible. Of course, using a 68cc aftermarket head will be much better as these more modern heads offer far better chamber designs that can enhance power while often not requiring as much ignition timing.
It’s also possible to add dished intake and exhaust valves that will add one or two cc’s worth of volume with a recessed valve face that might add a slight amount of volume to the chamber. This also reduces the valve weight, which is another positive approach.
These are a few of the better ideas for altering compression for earlier high compression engines. If you have a late ‘70s engine, it will have the exact opposite issue of desperately needing compression with a boost of more than one full point just to get the engine back up somewhere close to 9:1. The best bet with these engines is to just swap to smaller chamber heads. Going from a 76cc chamber to 64cc chamber will pump the compression a full point on a typical 350-cu.in. small-block Chevy.


