|
|||||||
| Builds (and builds only) Got a build thread? It goes here, build threads anywhere else on the forum will be locked and never moved. |
 |
|
|
Thread Tools | Display Modes |
 09-22-2013, 12:53 PM
|
#1 |
|
Join Date: Dec 2005
Location: West Springfield, MA
Posts: 49
Trader Rating: (0)
 Feedback Score: 0 reviews
|
Dragula's Already "Finished" 5.0 Swap
So this story starts with my first car, a 1988 Mustang 5.0 which I bought in 2000 and drove every day through high school and college up until I bought a second car for winter duty.
 mimosa by Stang1282, on Flickr  yellowstang by Stang1282, on Flickr It just so happens that the second car was a 1988 Nissan 200sx which is what brought me here in the first place. I bought the car for practically nothing because the car wouldn't move and the owner didn't know if the trans was dead or the clutch was smoked. It turned out that the clutch was absolutely destroyed and all friction material was gone from the clutch disk. Easy swap and the car was back on the road. So I ended up finding a bunch of body parts from a SE in a junkyard in the same color and picked them up. Front lip, sideskirt, rear mudflaps and SE steering wheel.  200sxmid by Stang1282, on Flickr  200sxfront by Stang1282, on Flickr  dash by Stang1282, on Flickr And then a friend of mine wrecked a 240 and gave me the motor so I swapped that in. Plain old KA24e.  200sxmotor by Stang1282, on Flickr I sold the S12 a couple years later, which I regret because it was obnoxiously clean, it was just slow and the suspension sucked and I was a college student so I couldn't afford to dump money into it. So fast forward to this spring. The mustang is starting to get rusty in the wrong places, the strut towers are rotted almost completely through. I don't want to get rid of my first but strut tower and frame rail rot is a bit more major than I want to deal with so I figure I'll do the next best thing and at least let the motor live on.  So out came the motor in the middle of a rainstorm at night (I told myself earlier in the week I'd have the motor out by that day, no matter what the weather.  IMG_1325 by Stang1282, on Flickr  302 out by Stang1282, on Flickr And I picked up a 1991 240sx shell from a friend who had the car sitting in his yard for a bit for $250. The pick up...during another rainstorm.  240pickup by Stang1282, on Flickr Day 1  240sx by Stang1282, on Flickr The car was pretty rough and missing alot of things. |

|

|
| Sponsored Links |
|
09-25-2013, 09:34 PM
|
#2 |
|
Join Date: Dec 2005
Location: West Springfield, MA
Posts: 49
Trader Rating: (0)
Feedback Score: 0 reviews
|
So first things first. I take apart one car cause of rust and the first thing I get to fix on the new car....rust!
 Patch panel. Not very well secured. I wonder whats underneath...Pull out the vice grips and start pulling, blobular welds pop and what do we have? Giant Hole! Awesome. The patch was just a piece of a passenger side of some other 240.  Patch  oldpatch 240 by Stang1282, on Flickr Alot of cutting, grinding, cleaning, etc later and a few days of welding time and the hole is patched.  Looks like someone replaced the framerail as well. Welds on that part look iffy but apparently they were done by a different person than the patch...We'll see how it holds i guess. Passenger side wasn't nearly as bad but still needed some work.  So with that done, I went ahead and stitch welded the strut towers and frame rails inside the engine bay. Can kinda see some of the welds in the next few pics. Some clearancing of the trans tunnel and time to drop the motor in.  IMG_1385 by Stang1282, on Flickr Fits pretty nice. Test fitting the intake manifold, had to cut the bracing and the hood still won't clear. The front of the manifold hit so even spacing the back didn't help much. New radiator, homemade mounts, etc.  IMG_1423 by Stang1282, on Flickr Got started on making an exhaust. I tried to see if a stock mustang h-pipe would fit at first but it hung about 3-4 inches below the framerails, not good. So I had to separate the h-pipe and cut about 4 inches from the downward section and weld it back together. It tucks up nice above the level of the framerails so no risk of smashing that now.  under car by Stang1282, on Flickr I wanted to use as much stuff I had laying around as possible. I had an old BPM Twister II exhaust from a subaru sitting around so I decided to make the exhaust into single outlet. Ordered some 45* bends and a dual 2.5" to 3" collector and fit them up to the car. Mid production  IMG_1417 by Stang1282, on Flickr Finished product  IMG_1420 by Stang1282, on Flickr  IMG_1419 by Stang1282, on Flickr Fits pretty nice. Car is filthy.  IMG_1421 by Stang1282, on Flickr |
|
|
|
|
09-25-2013, 10:36 PM
|
#4 |
|
Join Date: Dec 2005
Location: West Springfield, MA
Posts: 49
Trader Rating: (0)
Feedback Score: 0 reviews
|
Random other stuff. Got some clear turn signals from Depo.
 IMG_1412 by Stang1282, on Flickr Had a driveshaft made by a local shop.  IMG_1406 by Stang1282, on Flickr Got this massive front swaybar from Sikky to clear my baffled and widened oil pan. I had to cut some holes in the hood to clear the intake manifold and throttle body.  swaybar by Stang1282, on Flickr Found a set of wheels and tires, Kosei Snipers, for sale for cheap, $150, installed some aerocatches since the car had no hood latch, and put a reverse scoop, cowl, whatever from a 85ish mustang over the holes I had to cut.  IMG_1455 by Stang1282, on Flickr Did all the wiring but no pics of that. Who would want to see that anyways. Wiring hell. Fired it up with minimal issues (car blew the ecu relay) and took it on its first drive for gas.  gas station by Stang1282, on Flickr  IMG_1460 by Stang1282, on Flickr Here's a terrible video of the car pulling away and driving down the road. Friend tried to instagram video it but it failed and screwed it all up. 302 Nissan 240 the worst video ever made - YouTube And no idea if this will work but here's a instagram vid on a friends page. http://statigr.am/viewer.php#/detail...76150_31141489 |
|
|
|
|
09-30-2013, 05:23 PM
|
#5 |
|
Join Date: Dec 2005
Location: West Springfield, MA
Posts: 49
Trader Rating: (0)
Feedback Score: 0 reviews
|
Had to take a quick break while I went down to H2Oi.
So I built the car in pretty short time but I neglected to source plenty of wheels and tires in the meantime for my first drift event. Had to make a mad rush to find some sets. I found a set of Work Euroline DH's nearby for reasonably cheap and picked those up.  eurolines by Stang1282, on Flickr And borrowed some wheels from a friend and got some tires mounted on some mustang wheels I had (plus adapters) The plan was to use the eurolines as fronts and drive-to-the-event rears and burn off the kosei sniper tires and the other wheels/tires. Loaded up the car, 8 wheels with tires mounted and 2 loose 17" tires.  IMG_1474 by Stang1282, on Flickr Drove the 1.5 hours out to Lime Rock for Lock City Drift - Beat the Heat event. The car made it out there with minimal issues, just a bit of a vibration at highway speed.  IMG_1477 by Stang1282, on Flickr  IMG_1483 by Stang1282, on Flickr This was my absolute first drift event or even first time throwing the car around at all so I was expecting to suck pretty bad. All I wanted to do that day was work on individual corners and basics and then work on other things like connecting corners at later events. So heres a quick video of one of the middle of the day runs. http://vimeo.com/72791447 Car did decent. The previous owner even took it for a rip so I know the car has it in her. Some minor issues popped up, particularly heat. Normally the car drives at a steady 207*F which is still ok for a cast iron block and head motor but after a few runs the temps would rise up to 230* so I had to park it for a bit. Later as the day got hotter, I'd have to park it after every run and let it cool, so that slowed down the day a bit. Helped me conserve tires at least... Once I got the car home, I wanted to work on keeping it cooler and buttoning things up a bit better. First things I did was bought a battery box and moved the battery to the trunk. This let me un-sandwich the air filter from between the hood and the battery so I could maybe get some cooler air. There was already a hole cut in the battery tray so I should be good for cool air there. I also made some homemade cooling plates to cover up the gaping hole in front of the radiator and bought a fan shroud since my fans were just fastened straight to the radiator. I also cut the hole under the scoop as big as it would go to try to extract some heat. Panels and intake  IMG_1518 by Stang1282, on Flickr Bigger hood hole  IMG_1484 by Stang1282, on Flickr The last 2 things I did were hook up the heater core so I could blast the heater if things started getting hot, and I also replaced the stock mustang 195* thermostat with a 180* piece. After all this, the car runs rock solid at about 189*-195*. So hopefully I should be all good for October 5th. So now I've gotta work on getting it looking decent. I picked up a set of 180sx tails since I've always liked the way these look.  Untitled by Stang1282, on Flickr And I'm working on getting some aero and maybe a 5 lug swap ready for next year. |
|
|
|
|
09-30-2013, 07:39 PM
|
#6 |
|
Zilvia Member
 Join Date: Jan 2010
Location: Orlando, Fl
Age: 40
Posts: 191
Trader Rating: (0)
Feedback Score: 0 reviews
|
I have a soft spot for Windsors, so I approve. Ford firing orders sound better than Chevy ones. Deal with it LS1 havers.
__________________
Assistant Fabrication Manager / Welder at Raw Brokerage 
|
|
|
|
|
10-10-2013, 10:15 PM
|
#7 |
|
Join Date: Dec 2005
Location: West Springfield, MA
Posts: 49
Trader Rating: (0)
Feedback Score: 0 reviews
|
Crappy video from Lock City Drift Driftoberfest
This was only my 2nd event so I still suck. Lock City DriftoberFest Nisstang - YouTube And a couple random instagram videos |
|
|
|
|
10-11-2013, 10:18 AM
|
#8 | |
|
Zilvia Addict
 Join Date: Feb 2010
Location: Albany NY
Age: 39
Posts: 607
Trader Rating: (5)
 Feedback Score: 5 reviews
 |
Looks good! I love it down at Lime Rock, I ran my first event there earlier this year. Always a good turn out, awesome track, and cool area. Even better when you get the cars running the outer road course while your there!
__________________
Quote:
|
|
|
|
|
|
10-17-2013, 10:40 PM
|
#10 |
|
Zilvia Addict

|
Great job!!!
I love this idea and that you managed to keep the hatch from super missle hippie status while building it. Your sir! deserve a Kudos!  keep it up and I look forward to seeing more updates and vids
__________________
Two-Tone owner#011509-Lightly Modded 
|
|
|
|
|
10-18-2013, 07:29 AM
|
#11 |
|
Join Date: Dec 2005
Location: West Springfield, MA
Posts: 49
Trader Rating: (0)
Feedback Score: 0 reviews
|
Thanks guys. It still looks a little missile-ish since the car was a little beat up when I got it, but hopefully that gets fixed up when I pick up some aero this winter.
I'm debating on staying cheapish with AIT G-power, or going up to an Origin Stream Line or Stylish kit. My only problem is being afraid of destroying pricey aero and driving less aggressively as a result. I really haven't heard much for reviews for the AIT stuff so I have no idea if it'll be absolutely terrible or not. |
|
|
|
|
10-23-2013, 12:55 PM
|
#12 |
|
Zilvia Addict
|
get a Chaser kit, cheap and wont hurt the heart so much when it breaks. However, it may have fitment issues
I like the look of the Origin kit though. my only real beef is that there is always a gap on the back bumper by the tail light garnish.
__________________
Two-Tone owner#011509-Lightly Modded
|
|
|
|
|
10-23-2013, 05:38 PM
|
#14 | |
|
Join Date: Dec 2005
Location: West Springfield, MA
Posts: 49
Trader Rating: (0)
Feedback Score: 0 reviews
|
Quote:
I also picked up a new drivers door since the one on there is pretty dented and the paint is chipped from when a tree hit the car at the previous owners house. And I got some new fenders to replace the seriously messed up ones on there. |
|
|
|
|
|
11-04-2013, 09:27 PM
|
#16 |
|
Join Date: Dec 2005
Location: West Springfield, MA
Posts: 49
Trader Rating: (0)
Feedback Score: 0 reviews
|
So a few random updates.
The front fenders were beat from previous owner drifting and looked pretty bad. The drivers side lip was pretty much torn out and worn to a sharp edge. 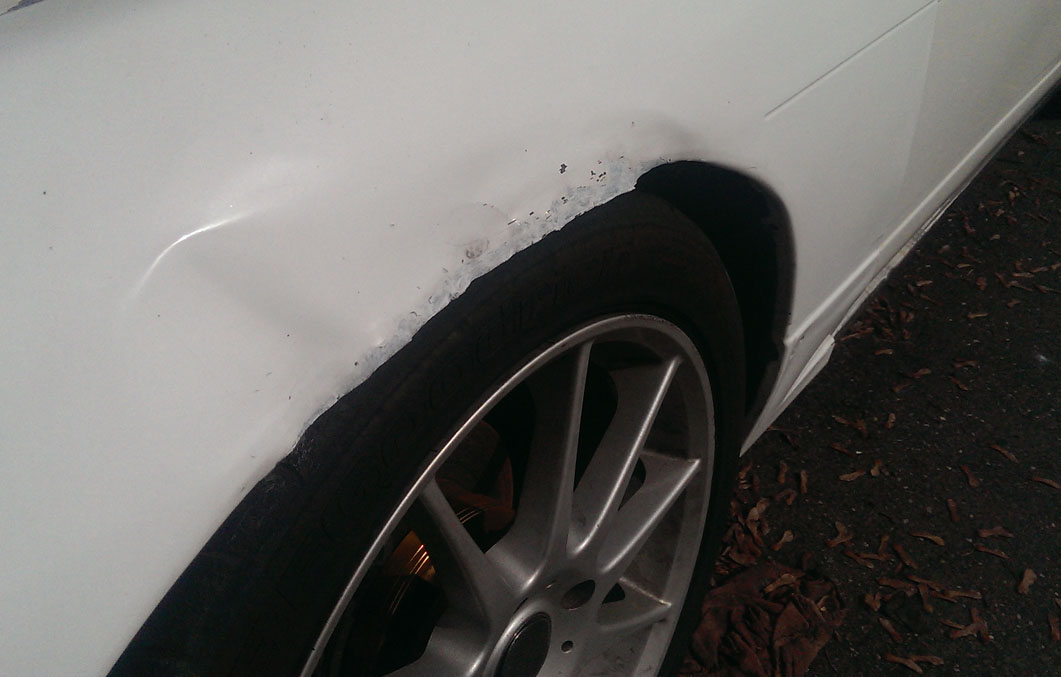 D_fender bad by Stang1282, on Flickr And the passenger side had a few dents and scrapes and was starting to tear through. 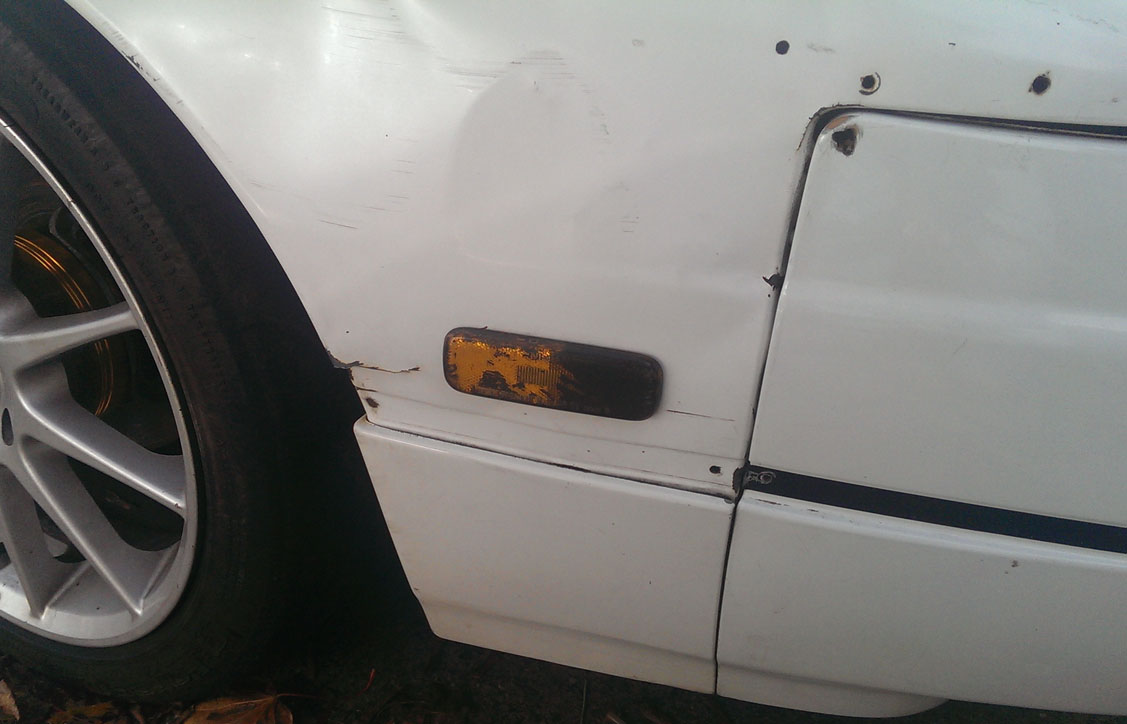 P_Fender bad by Stang1282, on Flickr And the drivers side door had some nice dents from when a tree fell and caught the side of the car a little bit. 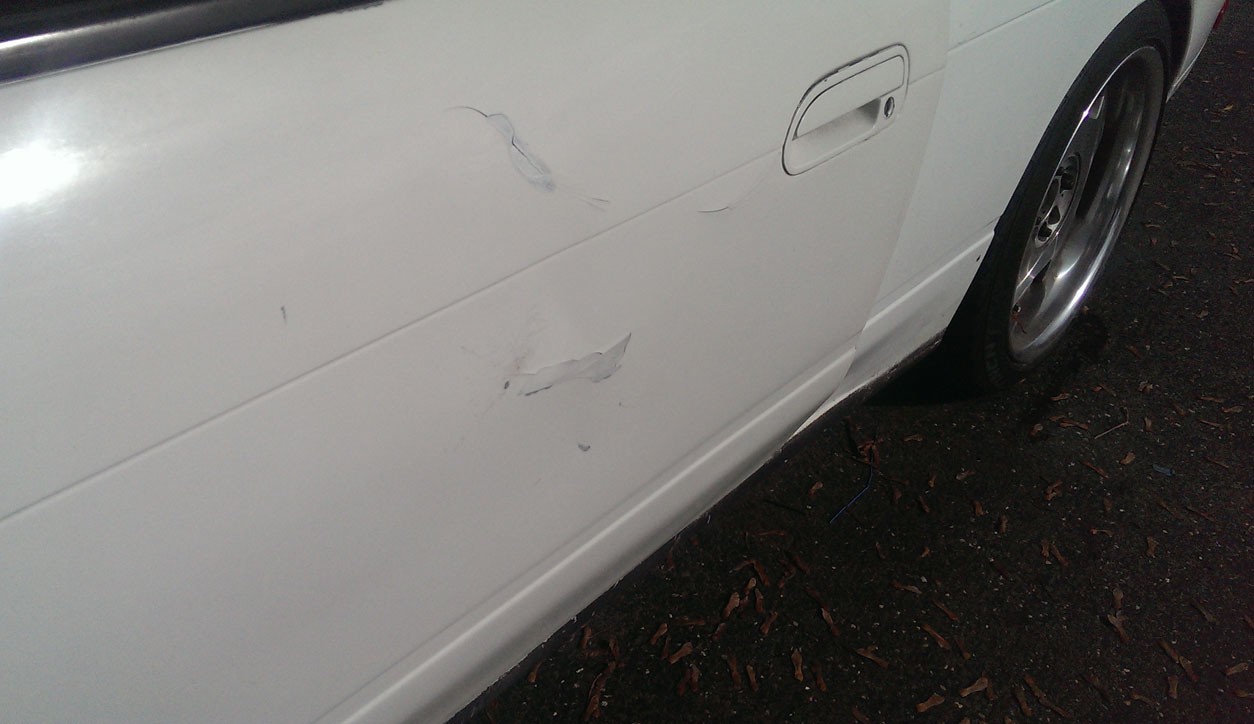 D_door bad by Stang1282, on Flickr So I kept an eye out and managed to find a junkyard parting a white 240 with good fenders and a good drivers door so I jumped on it. Mid parts swap  no_door by Stang1282, on Flickr And finished product. Excuse the terrible cell phone pic. It overexposed for some reason. 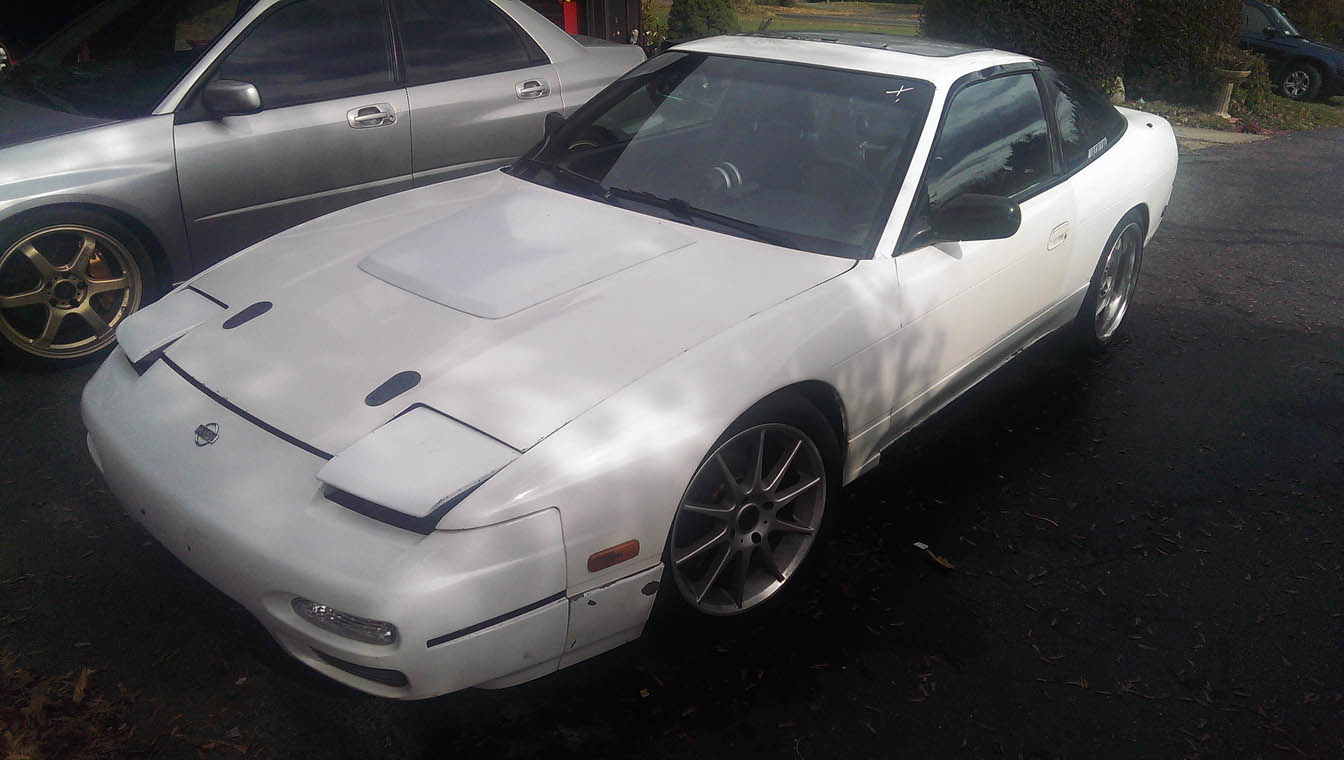 fixedish by Stang1282, on Flickr The only unfortunate thing is, the panels were a sort of pearl white so I get to add yet another random shade of white to the car. And then these showed up... 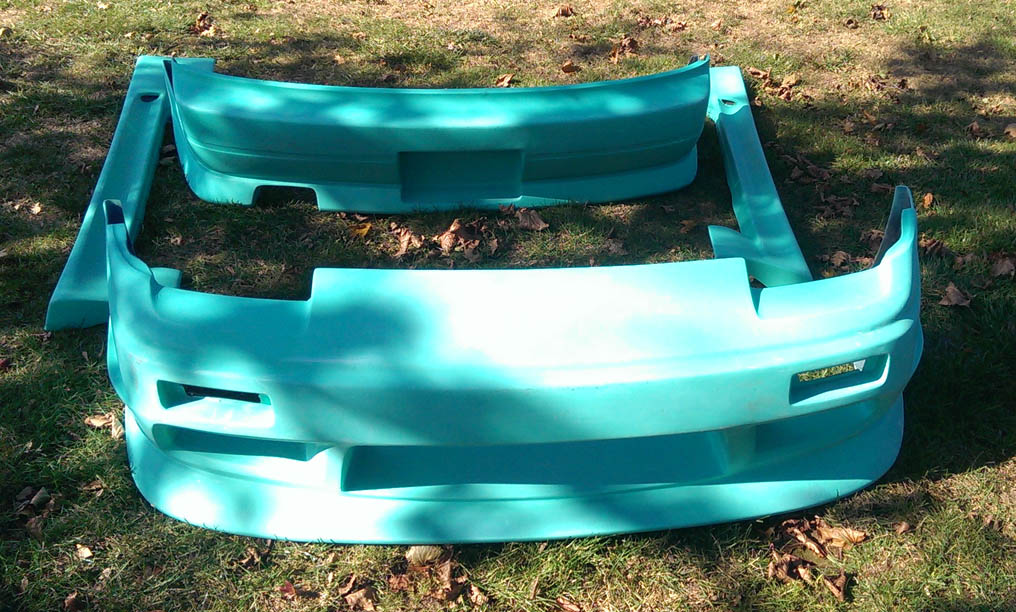 aero by Stang1282, on Flickr And the latest project. The trans I had in the car was in rough shape. It whined, ate driveshaft yokes (tailshaft bushing was worn), chattered, etc. I didn't dare drift in 3rd since it was so noisy but I was topping out 2nd most of the time at the track so I really need to be able to use 3rd for next year. So I picked this up and will be swapping it this weekend. The old trans is already out. 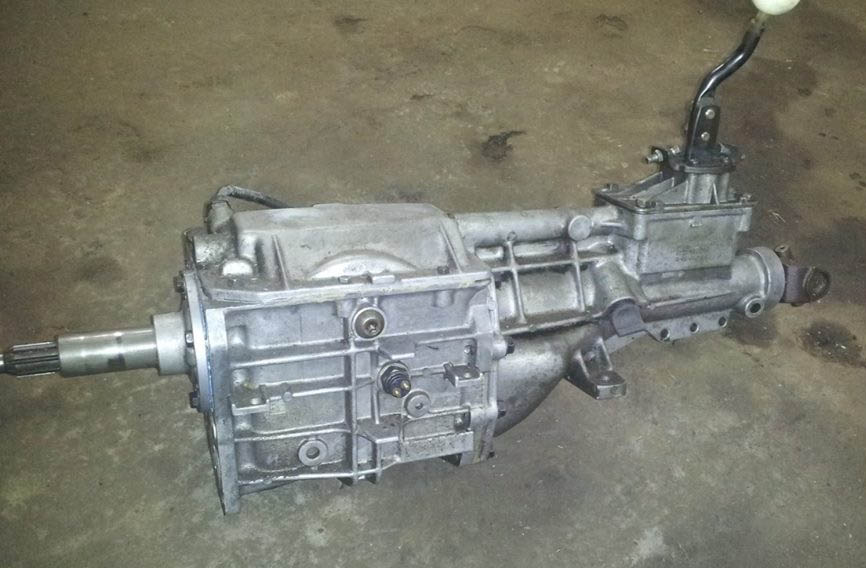 trans by Stang1282, on Flickr Fresh rebuilt World Class t-5 out of an early 90s mustang (strongest version aside from a t-5z. Thats it for now. I'm working on picking up a garage for my cars with a house attached. |
|
|
|
|
11-13-2013, 04:46 PM
|
#18 |
|
Join Date: Dec 2005
Location: West Springfield, MA
Posts: 49
Trader Rating: (0)
Feedback Score: 0 reviews
|
Random update.
I replaced the transmission this weekend. Car feels alot better and the drivetrain is way less noisy. I never took a pic of this pre installed but here's a quick shot of the skidplate on the car. Pretty beefy piece which just barely clears the pan. Definitely gives some extra confidence that I won't smash anything without trying hard at it. 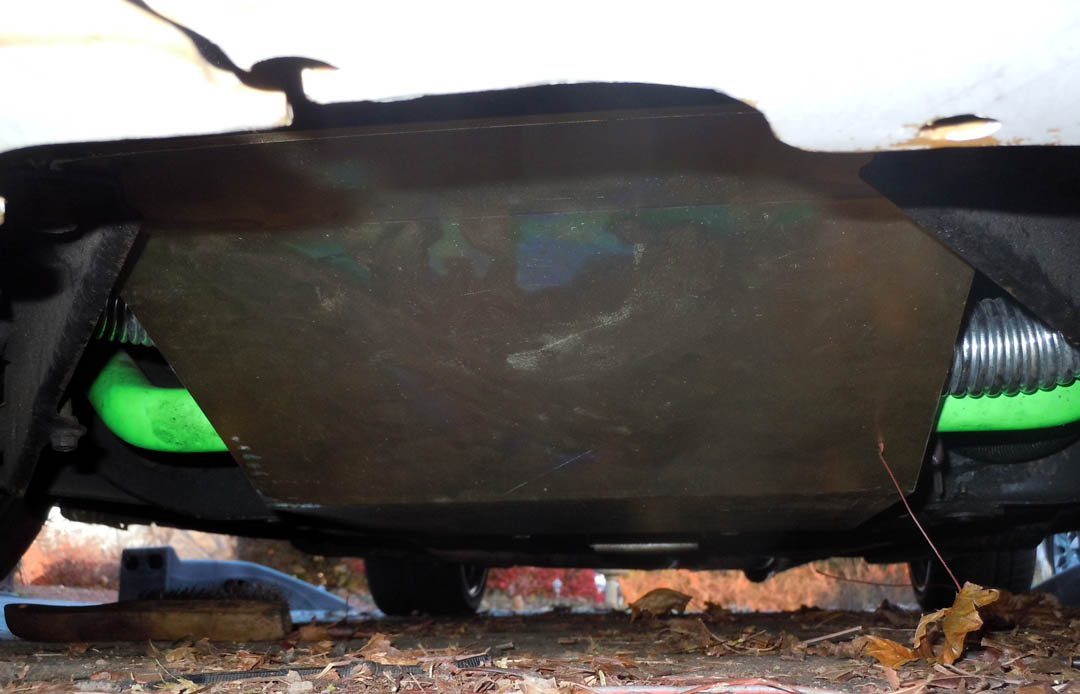 skidplate by Stang1282, on Flickr And I picked up a set of s13 turn signals for the aero.  signals by Stang1282, on Flickr |
|
|
|
|
11-18-2013, 08:59 PM
|
#19 |
|
Join Date: Dec 2005
Location: West Springfield, MA
Posts: 49
Trader Rating: (0)
Feedback Score: 0 reviews
|
Started test fitting parts. Threw the skirts on to see how much I need to work on them. They're tight and straining the corners in the front and rear of the skirts, but no cutting needed so far. Theres some high spots where the door rubs that I'm going to have to knock down or else theres no way paint will survive for more than a day. Otherwise, I'm happy with the way they look.
 240_skirts by Stang1282, on Flickr And then I threw the turn signals into the bumper to see how they'd look.  240_bumper by Stang1282, on Flickr |
|
|
|
|
12-01-2013, 10:53 AM
|
#20 |
|
Join Date: Dec 2005
Location: West Springfield, MA
Posts: 49
Trader Rating: (0)
Feedback Score: 0 reviews
|
Spraybombed the skirts with some duplicolor and threw them on. Not bad for rattlecan.
 nisstang_skirts_pass by Stang1282, on Flickr  nisstang_skirts_driver by Stang1282, on Flickr |
|
|
|
|
12-01-2013, 07:17 PM
|
#23 | |
|
Join Date: Dec 2005
Location: West Springfield, MA
Posts: 49
Trader Rating: (0)
Feedback Score: 0 reviews
|
Quote:
The front bumper, rear bumper and chassis are a brighter white. And the new front and rear bumpers and skirts are duplicolor spraybombed with some clear coat as well. Plus at some point the hatch was painted with a roller or something which I need to fix when it gets warm enough to paint outside. So yeah the car doesn't match in the least bit. I usually get a #50shadesofwhite from one friend whenever I put something up on Instagram. |
|
|
|
|
|
12-01-2013, 07:26 PM
|
#24 |
|
Join Date: Dec 2005
Location: West Springfield, MA
Posts: 49
Trader Rating: (0)
Feedback Score: 0 reviews
|
And since it was nice out today (40*), I got to test fitting the rear bumper which wasn't too bad. Just some minor sanding at the top corners.
 nisstang_bumper by Stang1282, on Flickr Now I've gotta clear out a larger area for my basement paint booth since this thing is huge. |
|
|
|
|
12-22-2013, 07:06 AM
|
#28 |
|
Join Date: Dec 2005
Location: West Springfield, MA
Posts: 49
Trader Rating: (0)
Feedback Score: 0 reviews
|
Thanks all, the front bumper is going to be a month or 2 away since I'm in the process of buying a house and I don't want to be pulling my front end apart right now with the car outside to test fit. I'm doing most of the prep work and imperfection filling now though so painting should happen quick when I have a chance.
That and I'm looking into getting some good aluminum heads to drop about 50 pounds off the front end of the car and give me a fair bit more power as well. |
|
|
|
|
12-22-2013, 04:32 PM
|
#29 |
|
Join Date: Dec 2005
Location: West Springfield, MA
Posts: 49
Trader Rating: (0)
Feedback Score: 0 reviews
|
And I just placed the order for a pair of Trick Flow Twisted Wedge 170 heads with 61cc combustion chambers. Should make for a good power increase and weight reduction. 25lbs each vs the stock cast iron heads at 50 lbs each.
They won't be going on for a little while though. I need to get some new stud mount rocker arms (right now I have pedestal mount 1.72 arms), headgaskets, pushrods, head bolts or studs... |
|
|
|
|
12-30-2013, 03:45 PM
|
#30 |
|
Join Date: Dec 2005
Location: West Springfield, MA
Posts: 49
Trader Rating: (0)
Feedback Score: 0 reviews
|
Had today off so I decided to do some test fitting to the front bumper. I think this is about as close as its going to get as far as closing up the hood gap unfortunately. So tomorrow I'll probably try getting the brackets and holes situated so I can paint up the bumper (its just in primer right now).
 nisstang_front_test by Stang1282, on Flickr |
|
|
|
|
| Bookmarks |
|
|


 Linear Mode

